
In aluminum formwork construction, Heavy Duty Prop and Push-Pull Prop both belong to the steel prop family, but they do very different jobs on site. A Heavy Duty Prop is normally used as a vertical load-bearing prop under slab formwork, beam soffits, early striking heads, and other positions that carry vertical loads. A Push-Pull Prop is more often used as an adjustable raking prop for wall formwork, column formwork, shear walls, large wall panels, and column molds, where it helps with bracing, positioning, and plumbness correction. If both are treated simply as “steel pipe supports,” the site can easily run into the wrong selection, an unclear load path, poor plumbness control, or an incomplete safety check.
For main contractors, aluminum formwork subcontractors, and overseas construction contractors, choosing the right Heavy Duty Prop and Push-Pull Prop is a basic requirement for safe slab shoring, stable wall and column formwork, and good concrete finish quality.
| Item | Heavy Duty Prop | Push-Pull Prop |
|---|---|---|
| Main function | Vertical load-bearing support, commonly used for slab aluminum formwork, beam soffit formwork, early striking systems, and local support reinforcement. | Inclined push-pull support, commonly used for wall and column formwork positioning, plumbness adjustment, lateral stability, and formwork correction. |
| Load behavior | Mainly axial compression. The key checks are load capacity, stability, support height, and the bearing surface below. | Mainly push-pull adjustment and inclined stabilization. The key checks are connection points, angle, adjustment stroke, and anchorage reliability. |
| Common locations | Slabs, slab formwork, middle beams, early striking heads, and beam-slab support areas. | Wall formwork, column molds, shear walls, end walls, opening edges, and long-wall correction points. |
| On-site control focus | Keep the prop vertical, the base stable, the top contact reliable, and the horizontal ledgers and couplers tied into a stable system. | Keep upper and lower connections reliable, the threaded adjuster effective, the prop angle suitable, and the bracing locked after correction. |
| Can they replace each other? | They should not be substituted casually. A Heavy Duty Prop should not be used as a raking prop. | It should not replace a Heavy Duty Prop as the main vertical load-bearing support. |
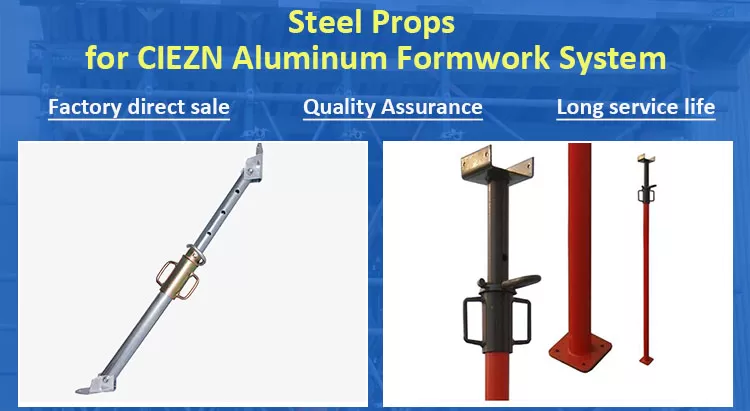
Heavy Duty Prop is suitable for slab aluminum formwork, beam soffit support, positions below early striking heads, and any area that needs to carry vertical load. Its main job is to transfer the load from fresh concrete, rebar, aluminum formwork panels, joists/middle beams, workers, and equipment down to the structure below. Selection should not be based only on maximum height. It must also consider clear floor height, slab thickness, beam depth, early striking head height, joist height, adjustment allowance, and construction load.
| CIEZN Heavy Duty Prop specification | Inner tube / outer tube | Selection guidance |
|---|---|---|
| 1.7m - 3.0m | 48mm / 60mm | Suitable for lower floor heights or local support areas, with enough adjustment allowance retained. |
| 1.8m - 3.2m | 48mm / 60mm | Commonly used for local slab support on standard floors, subject to review against clear height and formwork configuration. |
| 2.0m - 3.6m | 48mm / 60mm | Suitable for medium floor heights. Slenderness and stability restraint should be checked before use. |
| 2.2m - 4.0m | 48mm / 60mm | Suitable for taller floors or special areas, where horizontal bracing and base bearing conditions become more important. |
| 3.0m - 5.0m | 48mm / 60mm | High shoring conditions should be checked against the project-specific method statement, not arranged only by experience. |
When selecting a Heavy Duty Prop, try to keep the actual working height near the middle of its adjustable range. Avoid working too close to the minimum or maximum height. Near the maximum height, prop stability becomes more sensitive to plumbness, horizontal restraint, and the base bearing condition. Near the minimum height, there may not be enough adjustment travel for accurate level correction on site.
In a wall and column aluminum formwork system, a Push-Pull Prop works more like an adjustable raking prop. It is mainly used for formwork positioning, plumbness correction, and lateral stability. By pushing or pulling, it adjusts the position of the wall or column formwork so the panels meet the required alignment and plumbness. Unlike a Heavy Duty Prop, a Push-Pull Prop should not be used as the main vertical load-bearing component for slab formwork.
| CIEZN Push-Pull Prop specification | Inner tube / outer tube | Selection guidance |
|---|---|---|
| 1.6m - 2.9m | 48mm / 60mm | Suitable for lower wall and column formwork or local short-brace correction. |
| 1.8m - 3.2m | 48mm / 60mm | Suitable for common wall and column raking props and standard-floor correction. |
| 2.0m - 3.6m | 48mm / 60mm | Suitable for medium-height walls, column molds, and shear wall correction. |
| 2.2m - 4.1m | 48mm / 60mm | Suitable for taller walls or positions that need a longer adjustment stroke. |
| 3.0m - 5.0m | 48mm / 60mm | High walls or large formwork panels should be checked together with the connection details and project-specific method statement. |
Push-Pull Prop selection should consider length, installation angle, upper and lower connection points, adjustment stroke, and wall height at the same time. If the prop is too steep, horizontal adjustment is limited. If it is too flat, the vertical component and connection forces become unfavorable. On site, raking prop positions should follow the formwork shop drawings or the project-specific method statement and should not be moved casually.
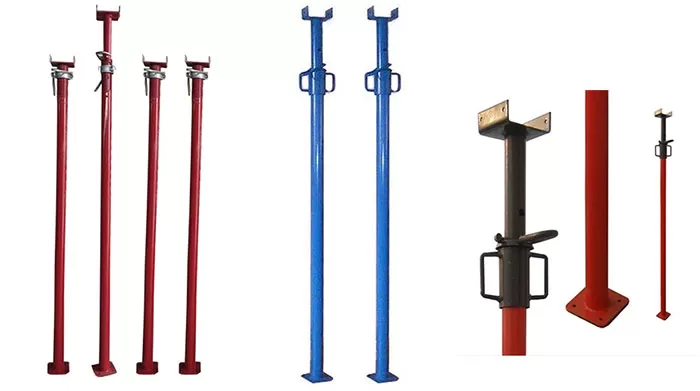
Before installation, select the correct Heavy Duty Prop according to clear floor height, slab thickness, beam depth, aluminum formwork panel thickness, joist or middle beam height, and early striking head height. Then roughly adjust the inner tube close to the target height. After rough adjustment, the pin must be fully inserted through the hole. It must not be half-inserted or replaced with non-matching rebar.
The prop base should sit on a firm, level, clean structural surface. Where needed, use a bearing plate that meets the load requirement. The top should contact the early striking head, U-head, or joist reliably. The prop should not lean visibly, and the base should not be placed on construction debris, wood scraps, mortar lumps, or loose materials.
After the slab formwork is laid, fine adjustment should be carried out with a level, laser level, or elevation control line. Adjustment should be done by zones and rows in a coordinated way. Avoid jacking one point aggressively, which can twist slab panels, deform joists, or concentrate load locally.
Once the height is adjusted, check whether every prop is actually carrying load. If the top is not in contact, the base is suspended, the prop shakes, or adjacent props have obvious level differences, adjust immediately. Before concrete placement, also check that horizontal ledgers and couplers are complete, so the shoring system is not just a set of isolated vertical props.
The upper end of a Push-Pull Prop is usually connected to wall and column formwork, a waler, or a dedicated connector. The lower end is fixed to the slab, an embedded part, or a reliable anchorage point. Connecting pins, bolts, and base plates must be complete. Temporary lap joints or friction-only fixing are not acceptable.
After initial formwork installation, rough adjustment should follow the axis lines, edge lines, and control lines. A Push-Pull Prop can move the formwork by pushing and pulling, but it cannot replace bottom locators, pins and wedges, or the tie system. If the bottom alignment of the formwork is wrong, correct the positioning first, then use the raking prop for fine adjustment.
Plumbness correction should be checked with a plumb bob, straightedge, laser instrument, or total station. For long walls, do not judge from only one point. Check the wall ends, wall middle, opening edges, internal and external corners, and intersections with adjacent walls. After adjustment, lock the threaded adjuster and connectors to prevent loosening or springback during concrete placement and vibrating.
During concrete placement, the lateral pressure on wall formwork changes continuously. Assign workers to inspect the Push-Pull Props, walers, tie rods, pins and wedges, and internal and external corner joints. If formwork movement, loose nuts, raking prop springback, or local grout leakage is found, deal with it promptly.
| Review item | Heavy Duty Prop | Push-Pull Prop |
|---|---|---|
| Load path | Check whether slab loads are transferred through panels, joists, and early striking heads to the props and the structure below. | Check whether lateral force from wall and column formwork forms a stable system through walers, raking props, and anchorage points. |
| Height range | Check whether the actual working height is within the allowable range and whether adjustment allowance remains. | Check whether the raking prop length matches the wall height and installation angle, and whether the threaded adjuster still has usable travel. |
| Connections | Check whether the top U-head, early striking head, base, and pin are complete and reliable. | Check whether the upper and lower connectors, pins, bolts, base plates, and locking parts are complete and reliable. |
| Stability measures | Check whether horizontal ledgers, couplers, transverse restraint, or other stability measures required by the method statement are installed. | Check whether the prop angle is reasonable and whether it provides effective push-pull adjustment and lateral stability. |
| Concrete placement risks | Check for concentrated material stacking, placing boom load, pump pipe impact, or loose props. | Check for wall movement, loose raking props, formwork springback, or corner formwork blowout. |
When purchasing Heavy Duty Props and Push-Pull Props, confirm the minimum height, maximum height, inner tube outside diameter, outer tube outside diameter, wall thickness, surface treatment, nut type, base plate size, pin quality, and compatibility with the aluminum formwork system. CIEZN steel props are available with painted or galvanized surface treatment, and different lengths and adjustment types can be selected according to the project and environment. For sea-freight projects, also pay attention to packaging, accessory completeness, spare-part ratio, and on-site installation guidance.
From a project management view, the shoring system should be included in aluminum formwork shop drawing design instead of being supplemented temporarily after the formwork arrives. Slab shoring, wall and column raking props, the tie system, walers, pins and wedges, horizontal ledgers, and couplers should be checked as one coordinated system. Only when prop selection, connection details, and on-site adjustment form a complete loop can the high-reuse and high-accuracy advantages of aluminum formwork be achieved on site.
Not recommended. Heavy Duty Prop is mainly used for vertical load-bearing support, while Push-Pull Prop is mainly used for inclined push-pull adjustment and formwork stability. Their force directions and site functions are different, so they should not be interchanged casually.
A Push-Pull Prop is mainly used for wall and column formwork alignment adjustment, plumbness correction, and lateral stability. It should work together with pins and wedges, walers, the tie system, and bottom formwork locators.
No. In addition to maximum height, you also need to check the actual working height, adjustment allowance, load capacity, stability restraint, base bearing surface, and compatibility with the early striking head.
In most cases, horizontal ledgers, swivel couplers, right-angle couplers, or other stability measures should be installed according to the method statement. Isolated props create higher risk, especially in taller shoring, concentrated-load areas, or large slab formwork zones.
Check prop specification, support height, plumbness, top contact, base bearing, pins, nuts, horizontal ledgers, couplers, raking prop connections, walers, pins and wedges, and the overall formwork alignment.
Heavy Duty Prop and Push-Pull Prop are two different steel prop components in aluminum formwork construction. The former carries vertical support duties for slabs, beam soffits, and early striking systems; the latter handles push-pull correction and lateral stability for wall and column formwork. The right approach is to choose the prop type according to the construction position, force direction, floor height, wall height, formwork system, and project-specific method statement, then secure the system through proper connections, on-site adjustment, and concrete placement inspection. For buyers and contractors, prop selection is not a minor accessory issue. It is part of aluminum formwork system safety and concrete finish quality.
Phone: +8618711321769
Email: alame.vicky@gmail.com
WhatsApp: +8615400055585
Address:No.88, Shuntian Avenue, Xiangyin District, Xiangjiang New District Hunan Province

 EN
EN
 RU
RU
 AR
AR
 ES
ES